
This blog’s starter project can be found at github.com/qstarsit/hcloud-kube-hetzner
Kubernetes is a brilliant workload API, the community has built a highly extensible standard which abstracts the underlying machines and infrastructure from our application deployments. However, the cloud-native ecosystem can come with a sense of vendor lock-in. Functionality like managed load balancing, seamless node autoscaling, extensive storage options, integrated networking, and polished operational tooling are what you pay a premium for.
Running and operating Kubernetes yourself, “The Hard Way”, can be overwhelming, and time intensive. That’s why in this post, we’re taking a look at[ terraform-hcloud-kube-hetzner](https://github.com/mysticaltech/terraform-hcloud-kube-hetzner. An open-source Terraform project that simplifies deploying a production-ready K3s cluster on Hetzner Cloud, striking a balance between ease of use, reliability, and cost efficiency. All while keeping true to our European origin 🇪🇺.
Hetzner
Hetzner is a German infrastructure provider that has built a strong reputation for offering high-performance hardware at reasonable and predictable prices. With less features than hyperscalers they focus on doing few things very well. This has made them a popular hosting provider among indie hackers and startups alike.
Their Cloud offering has matured a lot in recent years and features a solid API to manage resources. It features private networking, load balancers, network attached storage and virtual machines. This makes it a solid alternative for teams looking for proper automation on a more cost-effective platform.
Hetzner operates modern data centers primarily in Europe, while also offering locations in the USA and Asia. In light of the recent focus on sovereign data centers, the fact that Hetzner is a German company adds reassurance around data sovereignty.

Kube-Hetzner
[Kube-Hetzner](https://github.com/mysticaltech/terraform-hcloud-kube-hetzner is an optimized, easy-to-use terraform module to set up a (highly available) auto-upgraded cluster. It codifies many best practices required to run K3s reliably on Hetzner Cloud.
The project handles much of the heavy lifting involved in bootstrapping and maintaining a cluster: provisioning compute resources, configuring private networking, setting up load balancers, managing node pools, and wiring it all together. Upgrades are automated and rolling by default, reducing manual intervention and downtime during maintenance.
It integrates Hetzner’s native tooling directly into your cluster, including the hcloud CSI driver and the hcloud Cloud Controller Manager (CCM). This enables Kubernetes to automatically provision and manage resources like load balancers and block storage via Kubernetes.
MicroOS
In the world of containers, less is more. The same applies for the operating system that functions as the base for our workloads. Traditional server distributions like Ubuntu, Debian or RedHat Enterprise Linux include a wide range of packages and services for general-purpose use, many of which are unnecessary for container workloads. This has led to the development of container-centric operating systems; Talos, CoreOS, Bottlerocket and flatcar just to name a few.
Kube-Hetzner utilises openSUSE’s MicroOS for all of its nodes. MicroOS is a stable operating system with a small footprint specialized in running container workloads. It sports rolling releases, atomic & transactional updates and secure updates by default. The OS is designed to be predictable, resilient and to behave the same on every boot.
MicroOS is immutable and cannot be modified during runtime. Updates are applied transactionally using Btrfs snapshots, allowing the system to fully succeed or roll back to a clean state. In the event of a faulty update a previous snapshot is automatically booted with no manual interaction required.
A read-only root filesystem also reduces our attack surface. After a container is compromised, modifying host binaries or operating system configuration is not possible. Even if an attacker gains host-level access, any changes are discarded on reboot.
Our application workloads are managed independently from the host operating system and are not installed on the root filesystem. This prevents configuration drift and ensures all of our nodes remain interchangeable and can soundly be rolled out, replaced or recovered repeatedly.
K3s
The heart of our cluster consists of K3s, Rancher’s lightweight Kubernetes distribution. Designed specifically for compute-constrained environments like edge or IoT devices. K3s packages components like the Kubernetes API server, kube proxy and kubelet into a single binary to reduce dependencies and steps required to bootstrap a cluster.
It’s a fully conformant distribution that simplifies our operations. Despite its minimal design, K3s is production ready and well suited for small to medium-sized clusters. It compacts and abstracts a lot of the overhead that comes with running a standard Kubernetes installation.
Furthermore, K3s and Kube-Hetzner come with sensible defaults. You are free and able to change advanced configurations in your cluster such as the IP ranges used for the pod and service network or change the internal cluster hostname. More on these settings later as we’ll configure them with Terraform.
Planning our cluster
For this blog we’ll deploy a standard highly-available cluster. Three control plane nodes and three worker nodes spread out across Falkenstein, Nuremberg and Helsinki.
For cost efficiency, we’ll enable the Rancher local-path provisioner to make use of the disks attached to our VPS nodes. This lets us choose between regional block storage or disks attached to our nodes using local-path, depending on the workload.
I’ll opt out of using Longhorn as the local-path provisioner combined with the block storage is sufficient for my workloads. If you require storage that is replicated across regions and independent of pod scheduling decisions, you can enable Longhorn. Do beware of performance bottlenecks when using Longhorn and benchmark it for your use case.
💡 Alternatively, you could opt for a dual-region failover setup across the two German sites. While the Helsinki region generally has good server availability and acceptable latency for production workloads, its latency is still higher than the site-to-site connection between Falkenstein and Nuremberg.
Select your desired machine type for the control plane and worker nodes. I’ll opt for CX23 control planes (2 virtual cores / 4GB ram / 40GB disk @ €3,49/mo) and CX33 (4 virtual cores / GB ram / 80GB disk @ €5,49/mo) for our workers. These instances are part of Hetzner’s shared cloud offering, meaning resources are shared with other customers on the same physical host. In my experience, I haven’t observed significant CPU steal time and do not believe that Hetzner aggressively oversubscribes their servers. That said, you should evaluate this choice carefully based on your specific workload and business requirements.
That puts us up to €26,97 a month on our six machines so far. Now we need to decide on a network configuration for our cluster.
For this post, I’ll keep it simple. We’ll opt to give each node a public IP address and whitelist our IP address to connect on port 22 (SSH). The API Server will be closed for external traffic as we’ll put a load balancer infront of our control planes.
Additionally, our traefik ingress class gets its own load balancer. This gives us a highly available, seperate entrypoint for cluster management and application traffic. These two additional load balancers (lb11) bump up the price with €5.39/mo.
A public IP address costs €1,70/mo which adds an additional €10,20 making our total €47,95/mo pre-VAT and €58,03/mo with VAT.
To me, this is a very reasonable cost for our cluster. Barring promotional discounts and free tiers, a typical managed cluster starts at $70-$75/mo on GCP GKE or AWS EKS. That is just the cost of running your cluster, not the workloads you are going to schedule on it.
However, there are some options for those looking to push down the costs further:
1. Use a single load balancer or MetalLB
Instead of using separate load balancers for the API server and ingress traffic, you could consolidate to a single load balancer that handles both. This saves €5.39/mo, bringing the total down to €52.64/mo with VAT.
Alternatively, skip Hetzner’s load balancers entirely and use MetalLB as a software load balancer running inside your cluster.
2. Remove public IP addresses and use private networking
Each public IPv4 address costs €1.70/mo, totaling €10.20/mo for six nodes. By removing public IPs and connecting to your cluster through a bastion host, NAT gateway, or VPN solution, you can significantly reduce costs and improve security posture.
Options include:
- Bastion host: A single small node with a public IP that you SSH through to access cluster nodes
- WireGuard VPN: Set up a WireGuard server on one node or a separate instance to provide secure private network access
- Tailscale/Nebula: Use a mesh VPN solution for seamless private connectivity
This approach removes €10.20/mo in IP costs.
Rolling out our cluster
It’s time to actually deploy the cluster. Head over and clone our starter project to get started. Take note of the Important configurations section in the Readme file and change the values to your liking.
Now we assume that you have Terraform, Kubectl and the hcloud CLI installed. If you do not have these, install them now.
In the project directory, start by installing the terraform dependencies by running terraform init -upgrade.
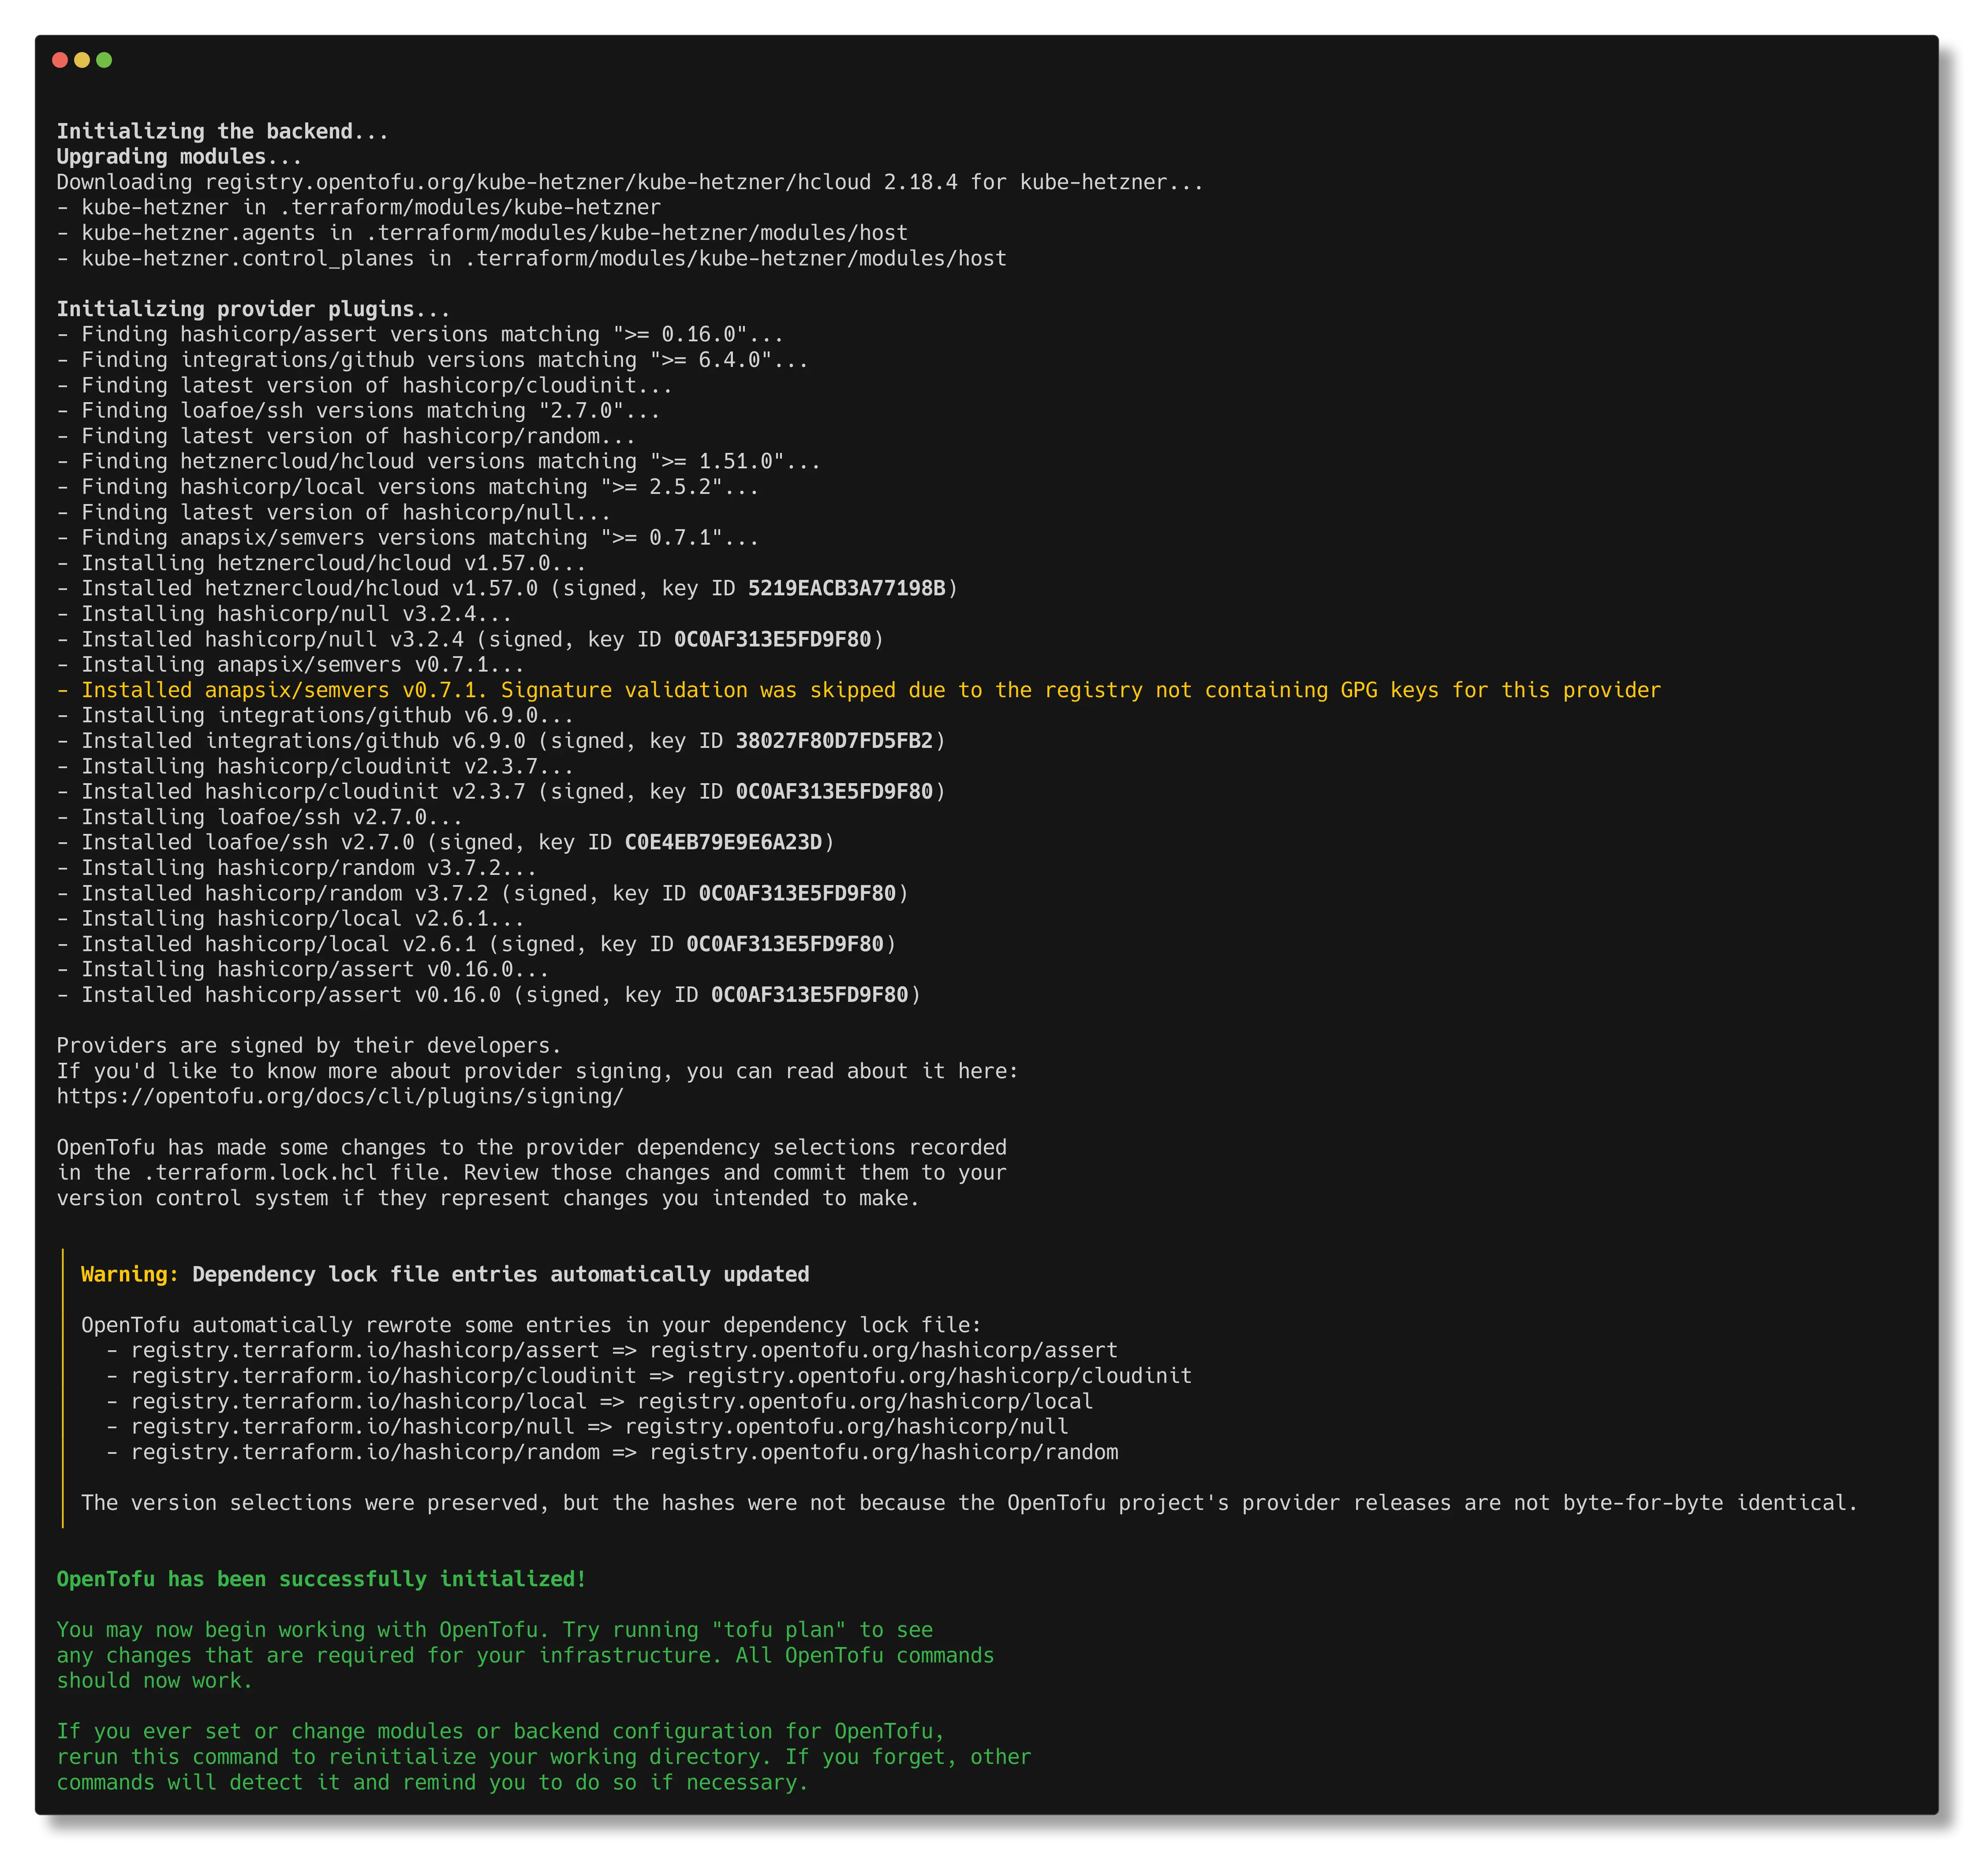
Next we plan our infrastructure changes with terraform plan. Take a moment to look over the plan, it shows you exactly what terraform is going to create for you in Hetzner. If you’re satisfied with the planned changes apply them with terraform apply -auto-approve. The applying process can take up to 10 minutes.
💡 Getting stuck waiting for MicroOS to become active in the
local-execstep during the apply? Make sure your machine has connectivity to the nodes and you’ve whitelisted your IP address for SSH connections.
After a successful apply we can get our kubeconfig with terraform output -raw kubeconfig > config. Move the config file to the default .kube directory ~/.kube/config for Linux & MacOS or %USERPROFILE%\.kube\config for Windows.
Now we can test connectivity with our cluster by running kubectl get nodes.

Success! My 6 node cluster has successfully rolled out with my nodes being spread over the three Hetzner zones. Checking my ~/.kube/config file I can see I am connecting to https://142.132.242.235:6443.
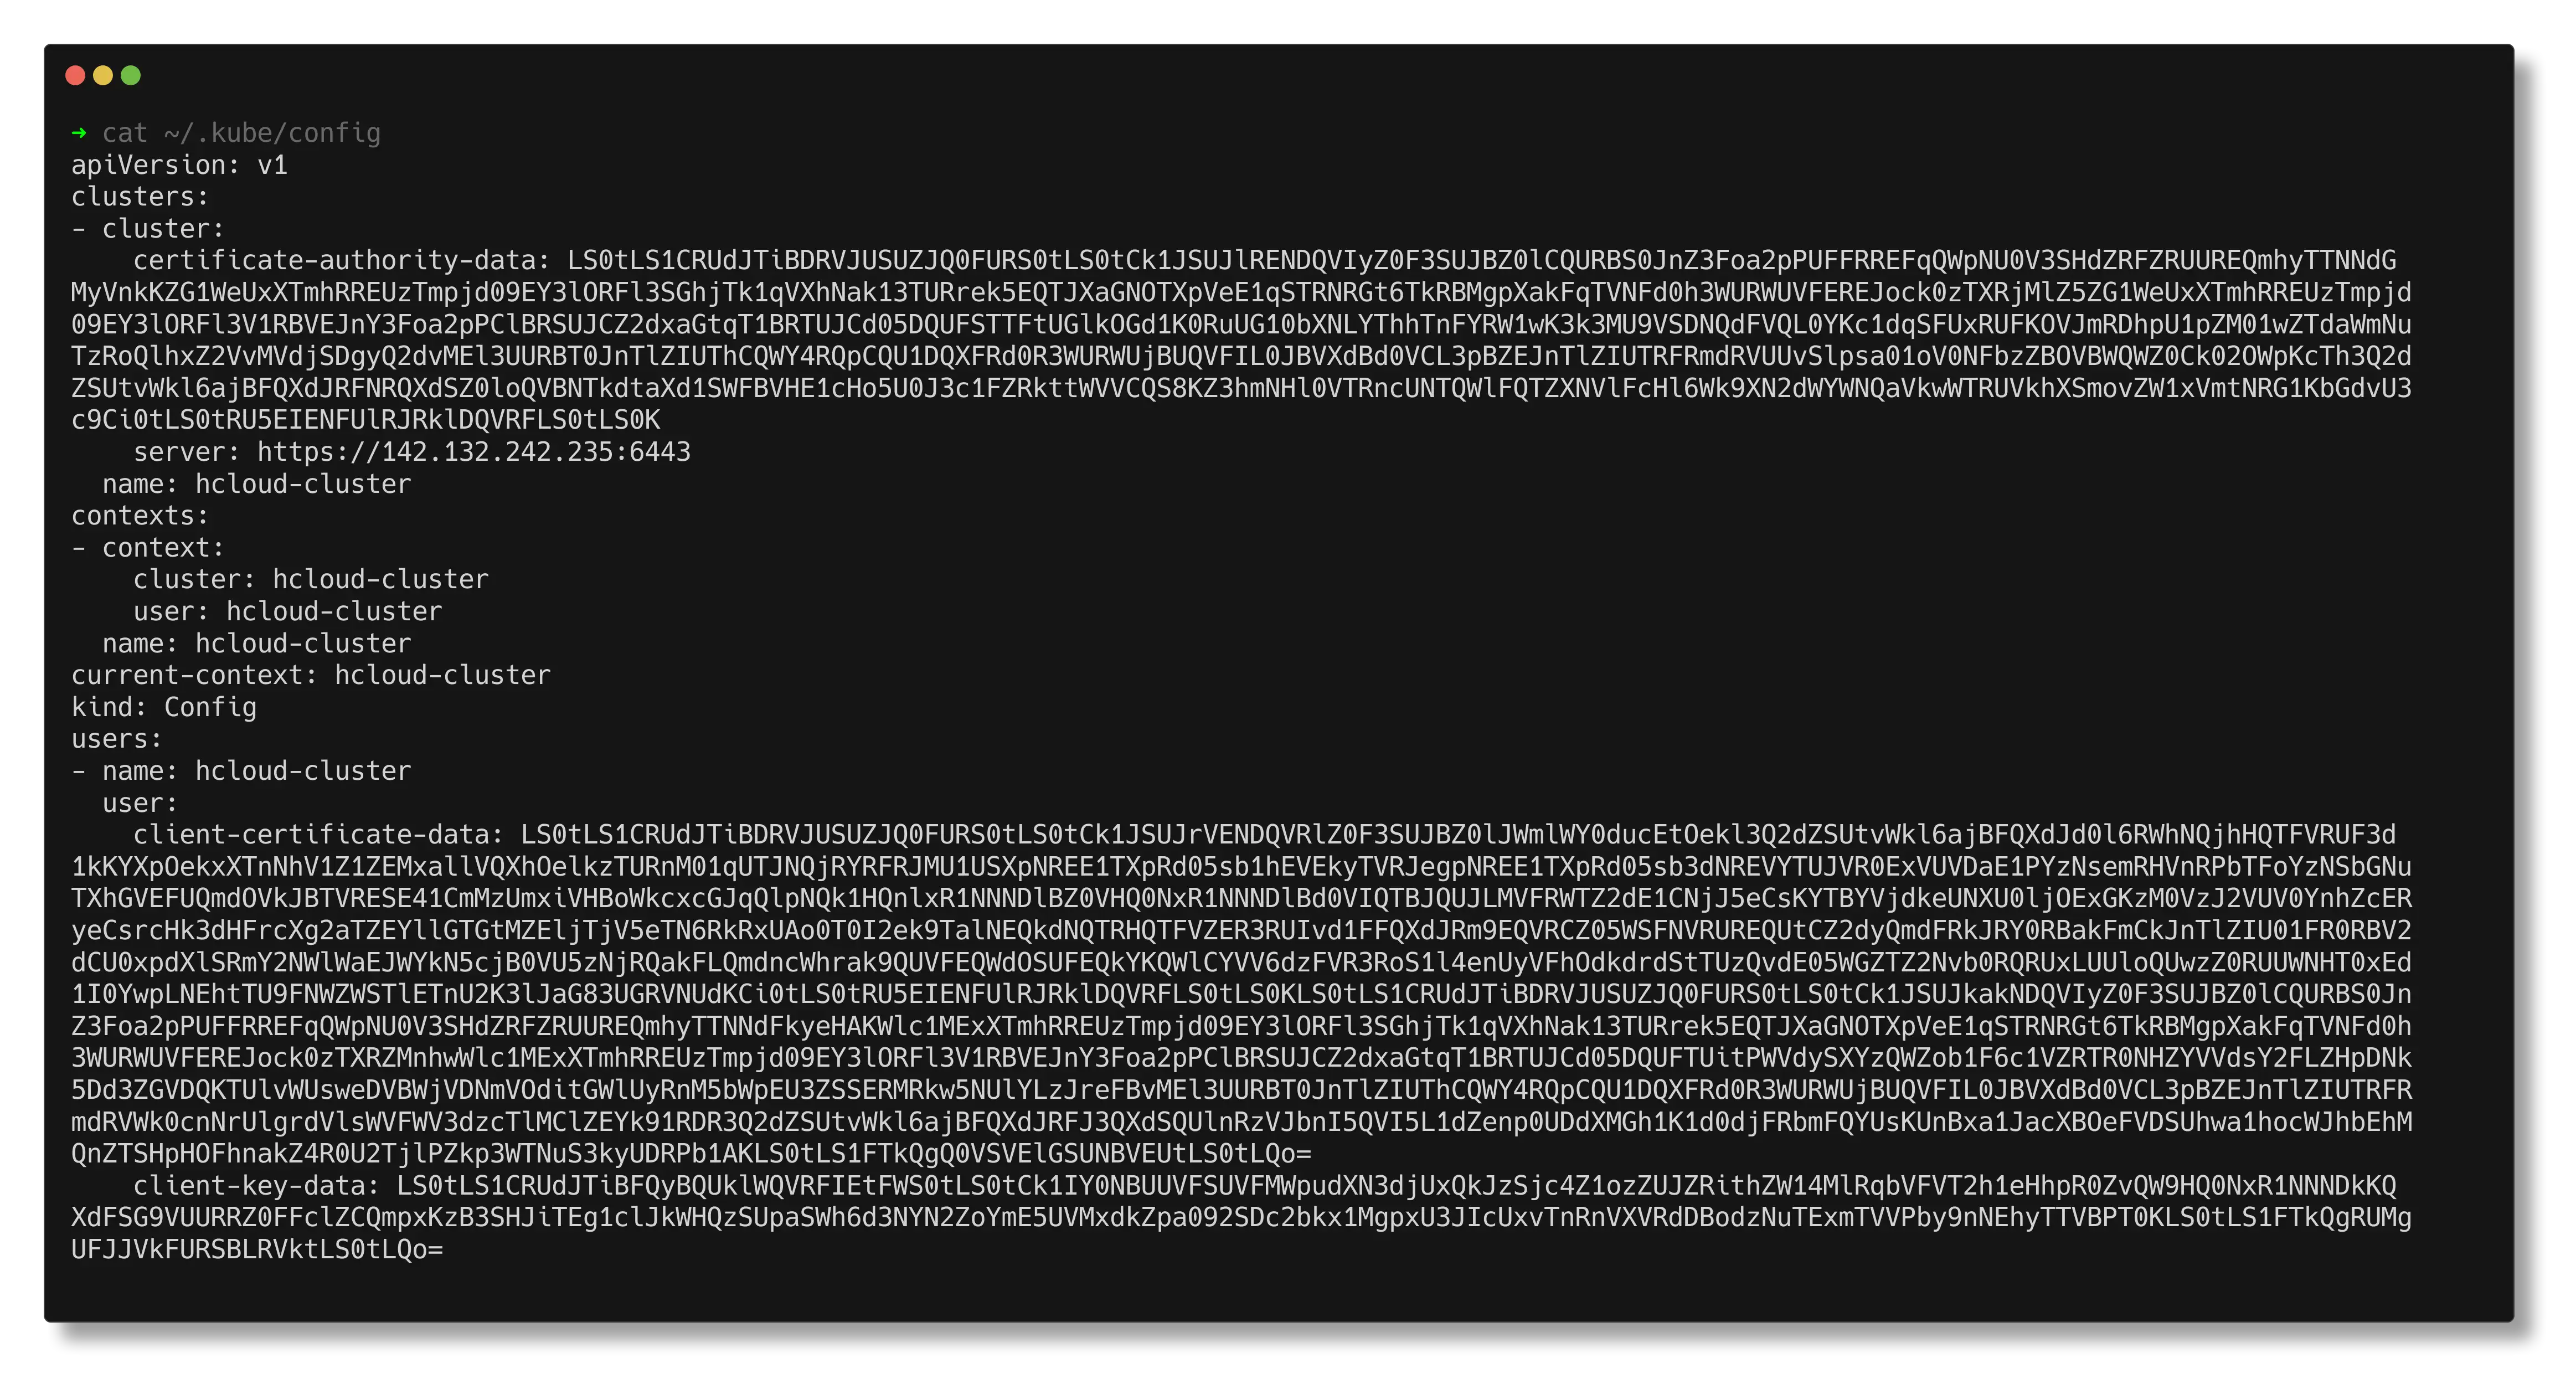
This should be the IP address of the controlplane load balancer, let’s verify it in the Hetzner UI.
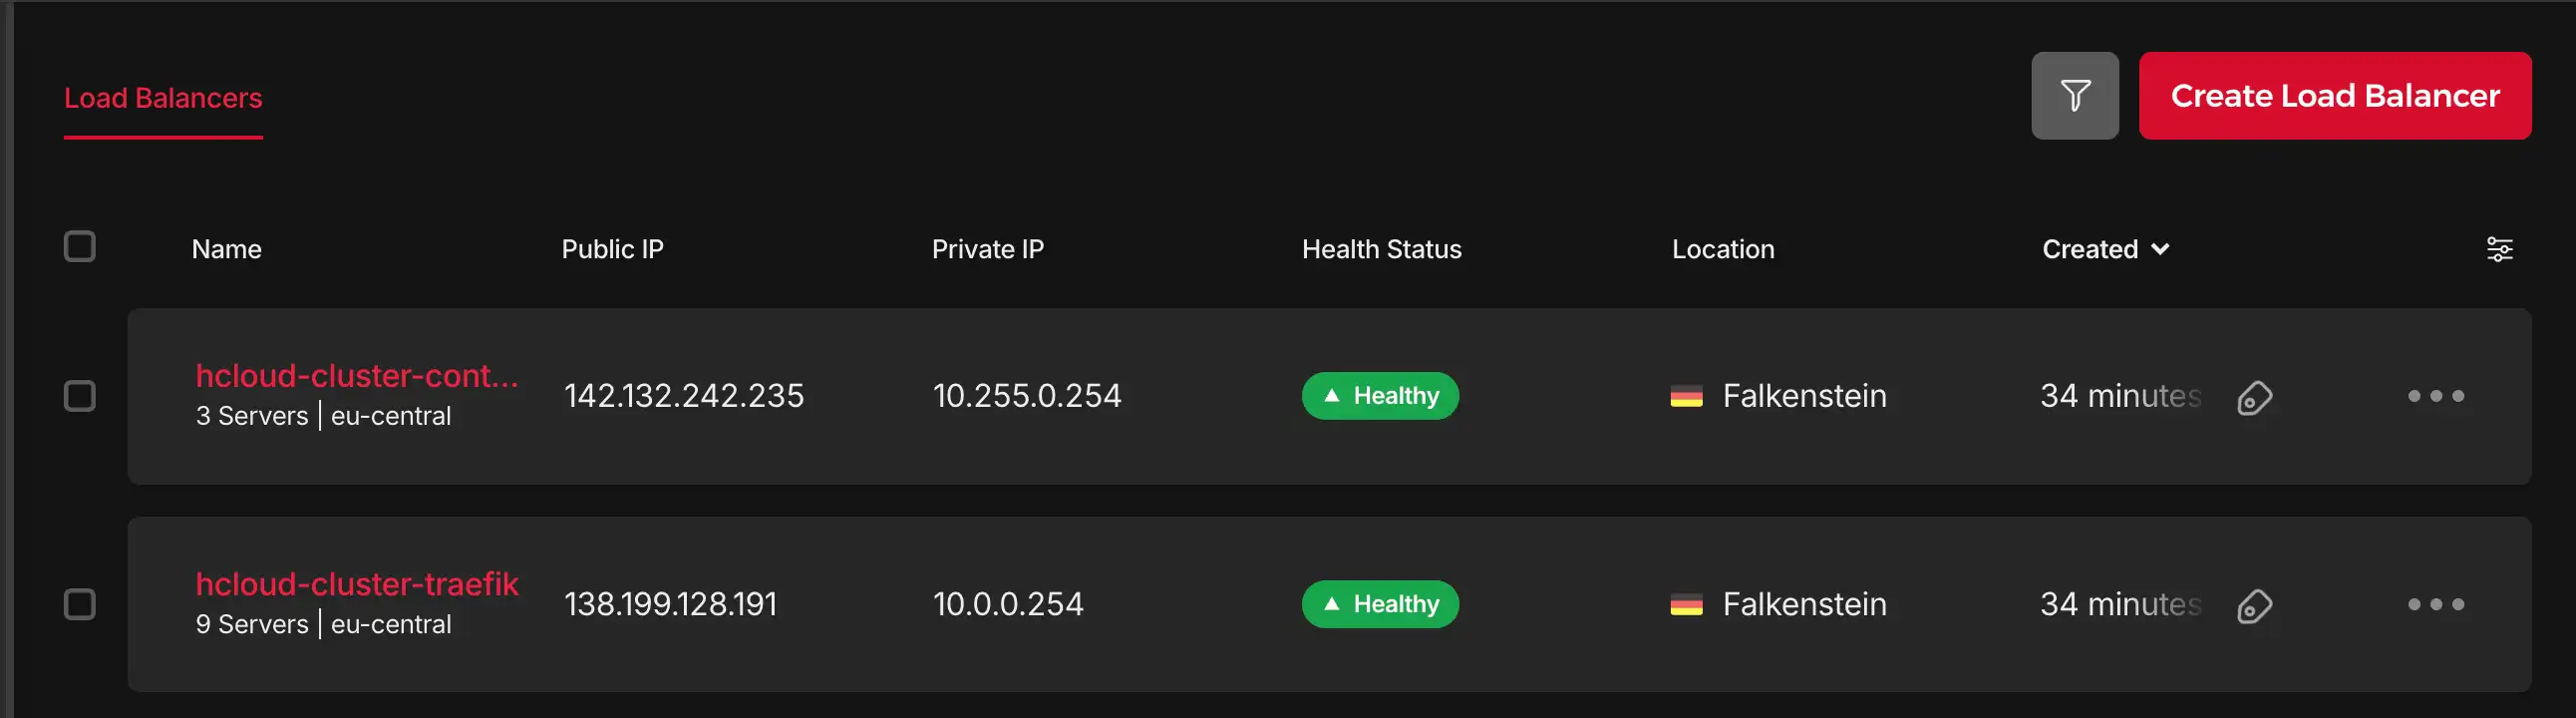
Perfect! All resources have been created successfully. Our cluster is now up and running with:
- 6 nodes spread across 3 availability zones
- 2 load balancers for API server and ingress traffic
- Private, encrypted networking between all nodes
- Automated K3s installation and configuration
- Ready to deploy workloads
From here, you can start deploying your applications using kubectl apply or install additional tooling like monitoring, logging, or CI/CD integrations. The cluster is production-ready and will automatically handle upgrades and maintenance through the built-in controllers we discussed earlier.
Backups
Kube-Hetzner makes use of K3s’ built-in etcd snapshot capability. This allows us to backup our cluster state to an external S3 compatible storage provider. K3s automatically creates etcd snapshots on the nodes themselves, relying solely on local snapshots leaves us vulnerable to a catastrophic node failure.
Node backups are facilitated through Hetzner’s built-in backupping mechanism.
Upgrades
KH uses Rancher’s System Upgrade Controller (SUC) to manage Kubernetes and node-level upgrades in a safe, fully automated way. SUC enables upgrades to be defined declaratively and executed natively within Kubernetes.
The controller continuously watches for Plan resources. When an upgrade is required, it selects the appropriate nodes and coordinates the rollout according to the defined strategy. This includes handling upgrade order, limiting concurrency, and applying cordon and drain rules. Each Plan clearly defines what is upgraded, how the upgrade is performed, and which nodes are affected.
Complementing the SUC, KH also deploys kured the Kubernetes Reboot Daemon. Kured handles node restarts when the OS signals that a reboot is required. Kured monitors the reboot signal and coordinates reboots across nodes managing concurrency and cordoning the nodes. You can tell kured to only reboot your nodes within set timeframes and on specified days only.